May 1, 2013

Meat safe project concept.

Not a finished product yet but it will be.

Antique meatsafe that has been sitting in my back room waiting patiently for someone to fix him up and make him like new again.
Also to remove the rust.

 Amongst my current study I think this project will have to wait till I'm on holidays. But I think he will look fantastic once complete.

Anyone have any tips on colours? I was thinking the original but this could change.


Vamping it up chair style

So I finally finished fixing up this chair. After having it take up valuable storage space in my home. To my partners happiness it has been fixed up. I replaced the sponge. The old stuff as you can see was very old and not spongey and squishy. There was no fabric when I got the chair. 

So whats happened to this chair? It's been Amefied (Yes I make up lame words sometimes). 
New spongey sponge, new luxe fabric, vintage off course and finished off with some gorgeous dusty pink cording. 

My first wonder thats actually being offered for sale. Everything else so far has been at home projects.
After

Before

Apr 4, 2013

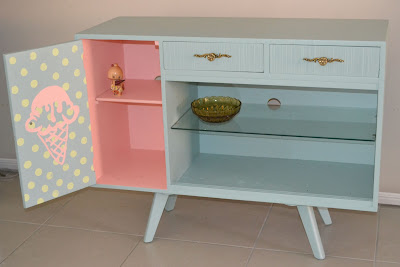
COMPLETED Tv Cabinet from Retro Sideboard.

You may or may not have seen my previous post with the sneak peek of the below cabinet but here is the end product.....

I finally found the handle! Also we took all the ugly machines that fill it when its in use. As explained in my old post this was once an orange and blue retro disaster. To some it would be beautiful but for me. NOT ENOUGH COLOUR!

I'm still thinking about painting the glassed interior section pink. But don't think my partner agrees.

Oh well tough cookies.

The ice-cream was hand painted on the polka dots using a furniture felt circle.


Feb 12, 2013

Yes I can make Macarons!!!!

Yes I make Macarons!!!!


Made a whole heap of these for my beautiful sister. There blue for the baby shower.

This is third time lucky with an Italian Macaron recipe so I was stoked when I saw that they were growing. My first try turned out flat and stiff. Second ones cracked on all the tops. So yes it is a labour of love with these babies, and a bit of research on what to do. But they are so worth it. I was worried about the humidity ruining them as I live in a pretty tropical climate. But nope they turned out gorgeous!

Wish I still had some leftovers.

A few got a little overcooked (the greeny tops) but thats my own fault of not knowing where to keep them in my oven.

In conclusion I officially love eating and making macaroons and look forward to making them again.

YUM YUM YUMMYKINS

Feb 4, 2013

Random item revamp

I started with this old cane fan, something I like about its design. 

 It's since been redecorated to resemble an apple above our dining table. (below)


DIY fabric labels

I was in the process of buying fabric labels but then had the thought, maybe I can make my own.

So I did and here are a few I made for little items such as tea cosies. Yes I will be making some tea cosies.

They are pretty easy to make yourself. I used freezer paper from Spotlight, iWeb, MS word, Fray stopper and a printer. 

Don't know how colourfast they are but I don't think you'd need to wash them all that often. 

If you want some made for you just let me know. 

Jan 23, 2013

Old photo frame to Jewellery storage/ display! & tutorial.

Once upon a time I went to the markets and bought a box of old photo frames.

Why I did not know at the time but I thought I could use them for something. After owning them for at least a year I have finally started doing something with them.

JEWELLERY DISPLAYS. Because indeed my necklaces and earrings should not be hidden in drawers. They should be proudly on show for anyone who visits the house to see. Again, partner would not agree. :)

So just a quick tutorial on how to make your own.

You need the following: 

- old frame, (repainted, wrapped in fabric. Whatever you feel).
Mine was a brown and gold frame, I painted it English Rose pink and distressed it a bit.

- staple gun, with staples (LOVE this little gadget)

- wool/yarn in whatever colour you want. I went matching because I had never used that one before.

- basic understanding of crochet and a 7.5 mm hook.


Step 1:
Grab the frame and remove the innards of the frame (glass and backing), keep for some sort of future project. I'm sure there's something for glass bits on google!

Stapled to inner lip of frame
Step 2: 
Get the crochet hook to work on the yarn and make a chain that when stretched a little is the width of the inside of the frame.

Step 3: 
Turn the work around and single crochet a rectangle that will fit snuggly in the frame space.

Step 4: 
Get the beautiful staple gun out and attach the crochet rectangle to the underside of the frame. The rectangle should be a little taught but not stretched to the max.

I stapled my rectangle to the inner piece where the glass and backing usually sit.

It's not perfect crochet work, but I don't think it needs to be :)
Step 5: 
Staple gun to the back some hanging wire (I used some string that was lying around the house).

Step 6:
Hang it on a wall with all your amazing earrings, pour a cup of tea, grab a chair, sit back and admire your amazingness. I know I did.


Finished product on the right. The one on the left: I stapled fabric to the back twisted some spray painted hooks to the top and voila necklaces and earrings on show! 

Finished Lalka Designs original is on the right.


Retro Side board to Ice-Cream Tv cabinet update.

So I have finished painting up the below sideboard. See it in it's full yellow wood glory, delightful dark blue velvet contact inside. I had already started taking it apart (no handles, no glass) in the picture, but you will see the finished product in a future post once I find the 3rd handle for the cabinet (I put it in a special place and can't seem to find that special place now that the jobs done grrrr). The picture above is a bit of a teaser. It's the internal cabinet door. Partner would have sighed terribly if I had it all my way and painted the ice-cream on the front. He already puts up with a lot of my colour obsessions. :D I will now run away and try and find that elusive third handle! Amstar up and away!!!!!

Dec 14, 2012

Brooch Bouquet for a unique bride.

I just wanted to put up a post about this brooch bouquet that I crafted for my beautiful mum. I had the idea to initially make a brooch bouquet for my own imaginary wedding which as I'm going to Uni for the next two years probably won't happen till after that. Money makes the world go round sadly.

Anyway, after watching three terrible chickedy flicks the brooch neared completion. The smile on mums face when she saw it was priceless. I felt special as her special day will always be remembered within the bouquet which she now displays proudly at home.

Bit of a sop story I know but I am a bit sentimental like that. By the time I have my own wedding the bouquets will most likely no longer be trendy so should be interesting to see what other bouquet I come up with for my wedding.

No traditional flowers for me I think. :)

Nov 25, 2012

Easily waisted skirt for inspiration!

A few days ago, I got in a sewing mood as I sometimes do. I made a skirt out of an old vintage dress. Which had already been previously altered.

I cut the top off and was left with the skirt. Although it was way to large to fit my waist or hips. I've found adding elastic into a band makes it super easy.

Although I don't use exact how to's in my sewing (I like learning from my sewing mistakes). I've found a how to on how to make a similar skirt, if not the same skirt. Check out the link below for a DIY how to.

http://www.juliaspoppies.com/2010/11/16/diy-simple-skirt/